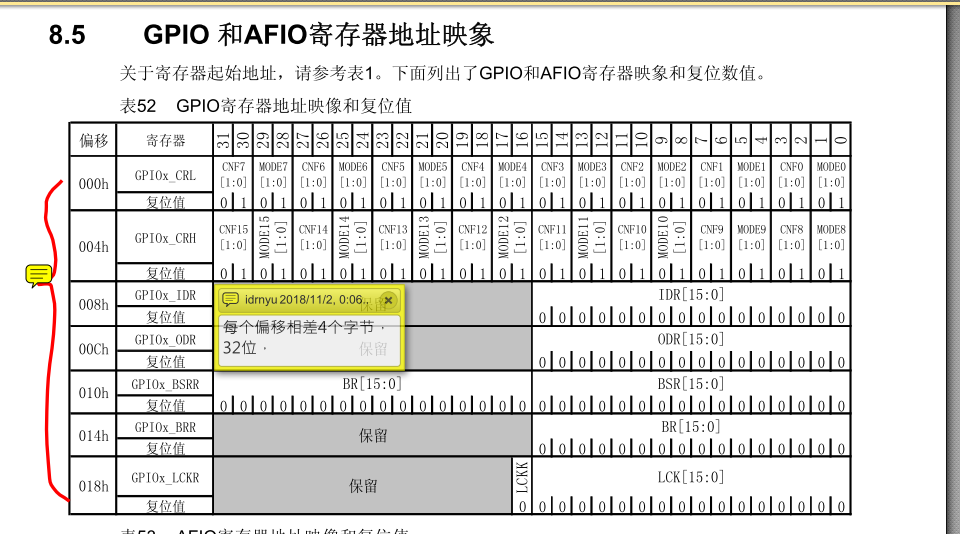
stm32寄存器点亮LED 发表于 2018-11-08 | 字数统计: 765 | 阅读时长 ≈ 4 使用MED编写STM32点亮LED程序 1234567891011121314151617181920212223// 需要引入启动文件// 首先找到起始地址 再 加上寄存器偏移地址,给他们写入数据即可// 首先打开时钟,设置GPIO模式,配置GPIO端口数据// 指针操作int main(void){ // 时钟控制在AHB总线上 复位和时钟控制(RCC)起始地址0x4002 1000 - 0x4002 13FF // APB2外设时钟使能寄存器(RCC_APB2ENR) 偏移地址:0x18 复位值:0x0000 0000 *(unsigned int *)0x40021018 |= (1<<2); // IOPAEN 位置一 开启GPIOA的时钟 // GPIO端口A 寄存器映射起始地址 APB2总线设备 起始地址0x4001 0800 - 0x4001 0BFF // 端口配置寄存器,PA0~PA7在端口配置低寄存器(GPIOx_CRL) (x=A..E) 偏移地址:0x00 复位值:0x4444 4444 *(unsigned int *)0x40010800 |= (3<<(4*1)); // 3=0011 左移一个4位 设置PA1 推挽输出50M翻转 置位操作 // 端口输出数据寄存器(GPIOx_ODR) (x=A..E) 地址偏移:0Ch 复位值:0x0000 0000 *(unsigned int *)0x4001080C &= ~(1<<1); // PA1 输出,写入0 可输出数据0 // *(unsigned int *)0x4001080C ^= (1<<1); // 取反操作}// 在引入的汇编启动文件中void SystemInit(void){} 进阶2定义自己的头文件 stm32f10x.h123456789101112131415161718192021222324252627282930313233343536373839404142434445464748495051525354#ifndef __STM32F10DDDx_H#define __STM32F10DDDx_H#define PERIPH_BASE ((unsigned int)0x40000000)#define APB1_PERIPH_BASE PERIPH_BASE#define APB2_PERIPH_BASE (PERIPH_BASE + 0x10000)#define AHB_PERIPH_BASE (PERIPH_BASE + 0x20000)#define RCC_BASE (AHB_PERIPH_BASE + 0x1000)#define GPIOA_BASE (APB2_PERIPH_BASE + 0x0800)//#define RCC_APB2ENR *(unsigned int*)(RCC_BASE + 0x18)//#define GPIOA_CRL *(unsigned int*)(GPIOA_BASE + 0x00)//#define GPIOA_CRH *(unsigned int*)(GPIOA_BASE + 0x04)//#define GPIOA_IDR *(unsigned int*)(GPIOA_BASE + 0X08)//#define GPIOA_ODR *(unsigned int*)(GPIOA_BASE + 0x0C)//#define GPIOA_BSRR *(unsigned int*)(GPIOA_BASE + 0X10)//#define GPIOA_BRR *(unsigned int*)(GPIOA_BASE + 0X14)//#define GPIOA_LCKR *(unsigned int*)(GPIOA_BASE + 0x18)typedef unsigned int uint32;typedef unsigned short uint16;// GPIO结构体 成员为32位typedef struct{ uint32 CRL; // 定义一个32位 4个字节的成员 刚好每个寄存器的首地址步进位4个字节 一个寄存器为32位结构 uint32 CRH; uint32 IDR; uint32 ODR; uint32 BSRR; uint32 BRR; uint32 LCKR;}GPIO_TypeDef;// RCC结构体typedef struct{ uint32 CR; uint32 CFGR; uint32 CIR; uint32 APB2RSTR; uint32 APB1RSTR; uint32 AHBENR; uint32 APB2ENR; uint32 APB1ENR; uint32 BDCR; uint32 CSR;}RCC_TypeDef;#define GPIOA ((GPIO_TypeDef*)GPIOA_BASE) // 强制类型转换位 GPIO_TypeDef 结构体指针类型#define RCC ((RCC_TypeDef*)RCC_BASE)#endif 改动C文件123456789101112131415161718192021222324252627282930313233343536#include "stm32f10x.h"void delay(int);// 首先找到起始地址 再 加上寄存器偏移地址,给他们写入数据即可// 首先打开时钟,设置GPIO模式,配置GPIO端口数据// 指针操作int main(void){// RCC_APB2ENR |= (1 << 2);// GPIOA_CRL |= (3 << (4*1));// GPIOA_ODR &= ~(1 << 1);// while(1){// delay(500);// GPIOA_ODR ^= (1 << 1);// } RCC->APB2ENR |= (1 << 2); // 置位某一位 GPIOA->CRL &= ~(0x0f << (4*4)); // 先清零 不然下面置位就会置位为 0111 GPIOA->CRL |= (3 << (4*4)); // 置位某一位 GPIOA->ODR &= ~(1 << 4); // 清零某一位 while(1){ delay(100); GPIOA->ODR ^= (1 << 4); // 取反 }}void delay(int num){ for(int i=0; i<num; i++) { for(int j=0; j<500; j++); }}void SystemInit(void){} ------------- END ---- 感谢您的阅读 -------------